Deep dive in Private OpenShift 4 clusters deployments in Azure
How can we generate a Private OpenShift cluster into an existing Azure Virtual Network (vNet) on Microsoft Azure? How can we deploy our cluster without exposing external / public endpoints accessible from internet? How we can achieve this in an automated and repeatable way?
Let’s dig in!
NOTE: Updated and fixed some minor typos on 12Aug2022.
1. Overview
From OpenShift 4.3+, you can install an OpenShift private cluster into an existing Azure Virtual Network (VNet) on Microsoft Azure.
But what is an OpenShift private cluster?
Private clusters are accessible from only an internal network and are not visible to the internet, so that cluster doesn’t expose external endpoints.
By default, OpenShift Container Platform is provisioned to use publicly-accessible DNS and endpoints.
A private cluster sets the DNS, Ingress Controller, and API server to private when you deploy your cluster. This means that the cluster resources are only accessible from your internal network and are not visible to the internet.
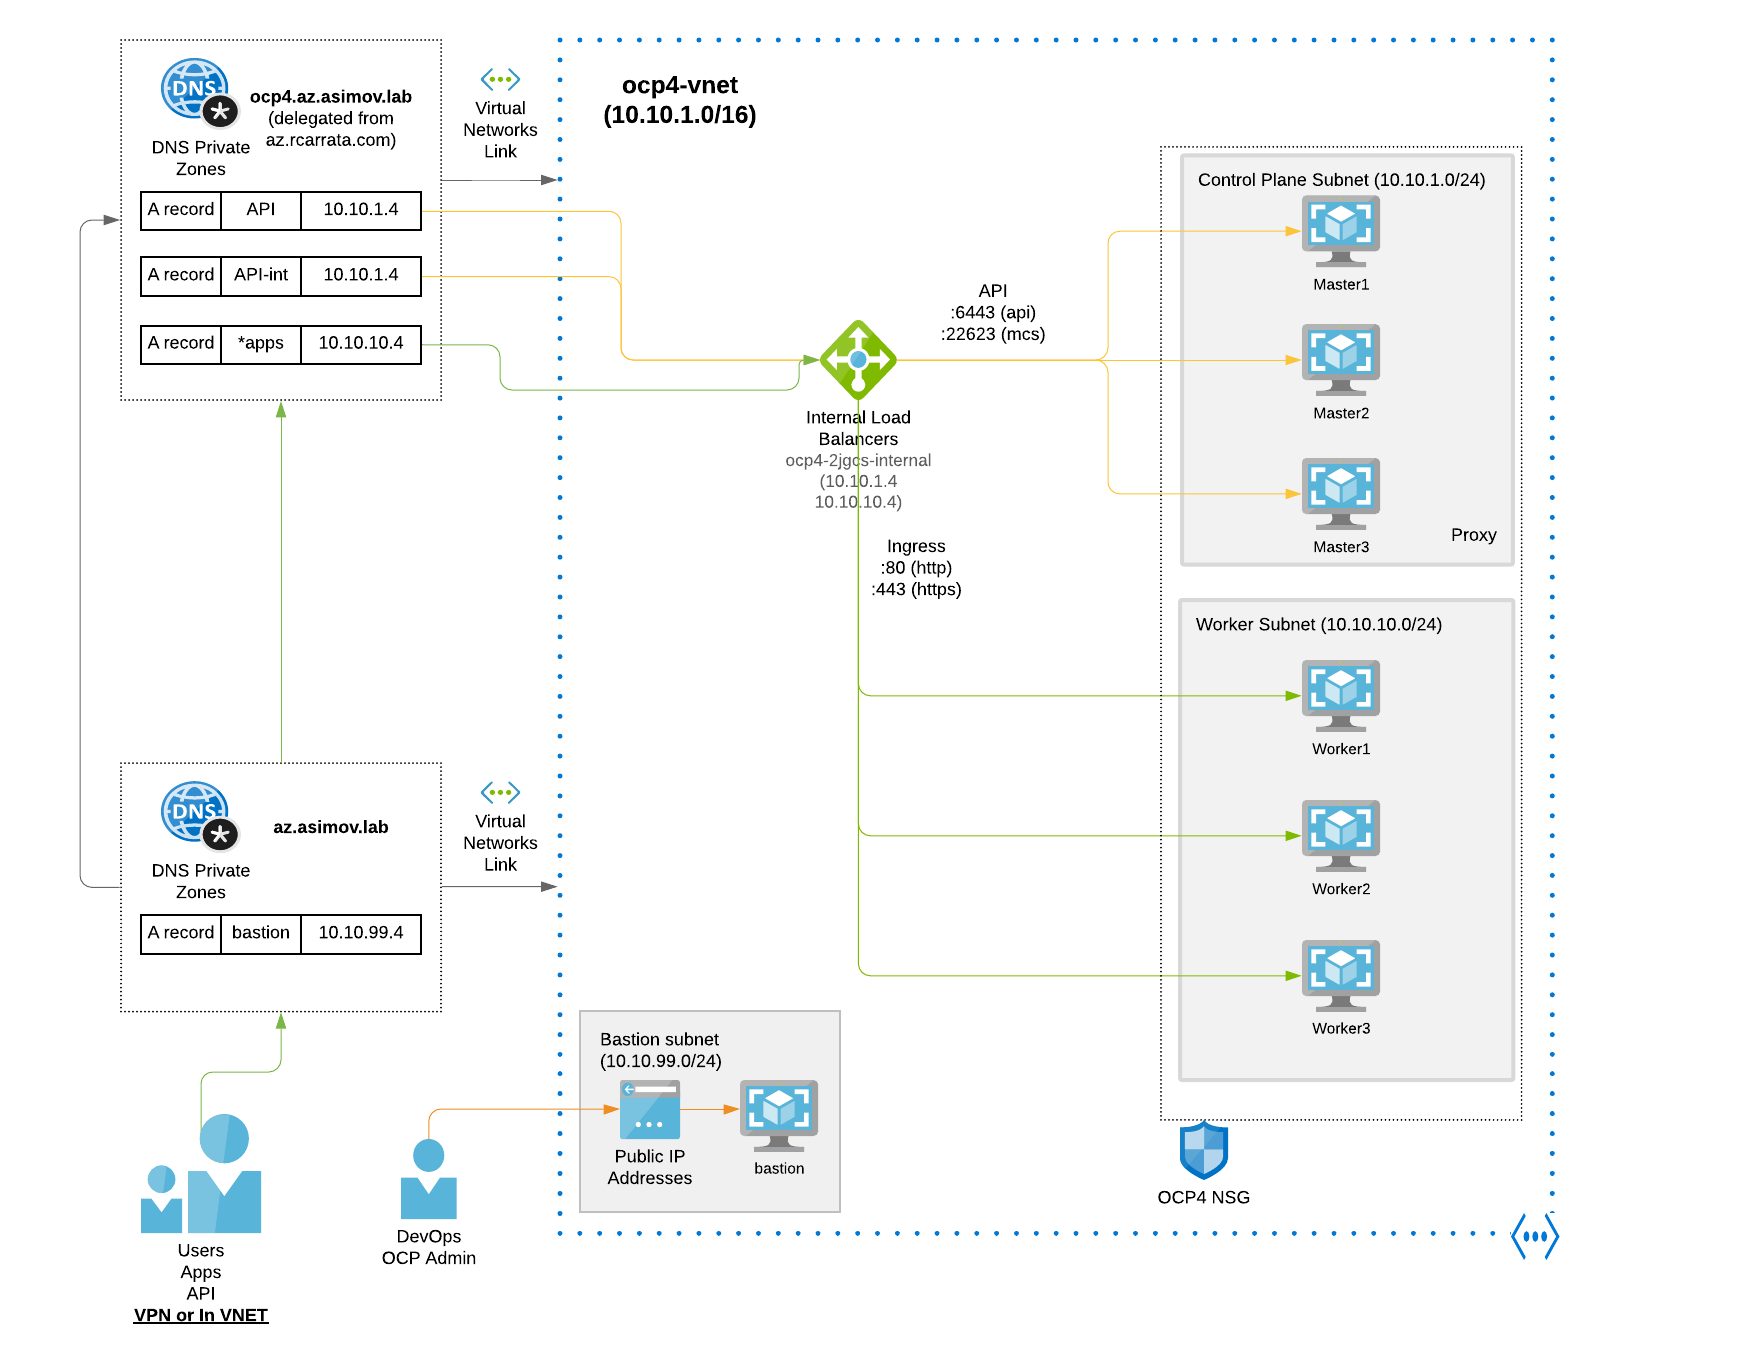
This is an example of an OpenShift private cluster architecture that could be helpful to understand the previous description:
As you can check the private clusters are as their name depicts private, so no public endpoint is exposed into internet.
For this reason to deploy a private cluster, we need to deploy from a machine that has access to:
- The API services for the cloud to which you provision (in this case Azure)
- The hosts on the network that we provision (same network or at least be routable)
- Access to internet to obtain installation media.
For example, this machine can be a bastion host on your cloud network or a machine that has access to the network through a VPN.
In this architecture deployment we’re using a bastion VM that will be used for deploy the OpenShift cluster from within, and also serve to jump through them to access to the API and the OCP Console.
IMPORTANT: this architecture and others depicted in this blog post works, but are NOT certified neither supported by Red Hat by all means, it’s just a PoC / demo. Please contact to your Red Hat’s representative or Red Hat support teams for help in case that you want to install in production.
2. Prerequisites
To create a private OpenShift cluster on Microsoft Azure, you must provide an existing private VNet and subnets to host the cluster.
On the other hand, the installation program must also be able to resolve the DNS records that the cluster requires, because the installation program configures the Ingress Operator and API server for only internal traffic.
We will use a private Azure DNS that solves the internal DNS records within the VNet, and not being resolved outside of this VNet, because this records have private/internal scope.
One important thing that we need to know is that with the Private clusters in Azure, the OpenShift cluster itself still requires access to internet to access the Azure APIs (and to fetch other requirements, such as container images, etc).
As we mentioned before when we deploy a cluster by using an existing VNet, we must perform additional network configuration before you install the cluster. We need to provision the following Azure infrastructure components and the VNet where they we will be deployed:
- Master / Workers Subnets (we must provide two subnets within your VNet, one for the control plane machines and one for the compute machines)
- Route tables (in our case by we will use the default Route table)
- VNets (one VNet containing all the subnets)
- Network Security Groups (explained in a bit)
Furthermore we will deploy also a Bastion VM that will serve with double purpose, for deploy the cluster resolving all the DNS private records and reaching all the subnets and resources needed for the installation of the private OpenShift cluster, and also once the cluster is installed to reach the API and Console of the OpenShift cluster deployed within the VNet (remember that is not exposed in the internet, and have not any public endpoint).
For this we will need to deploy also:
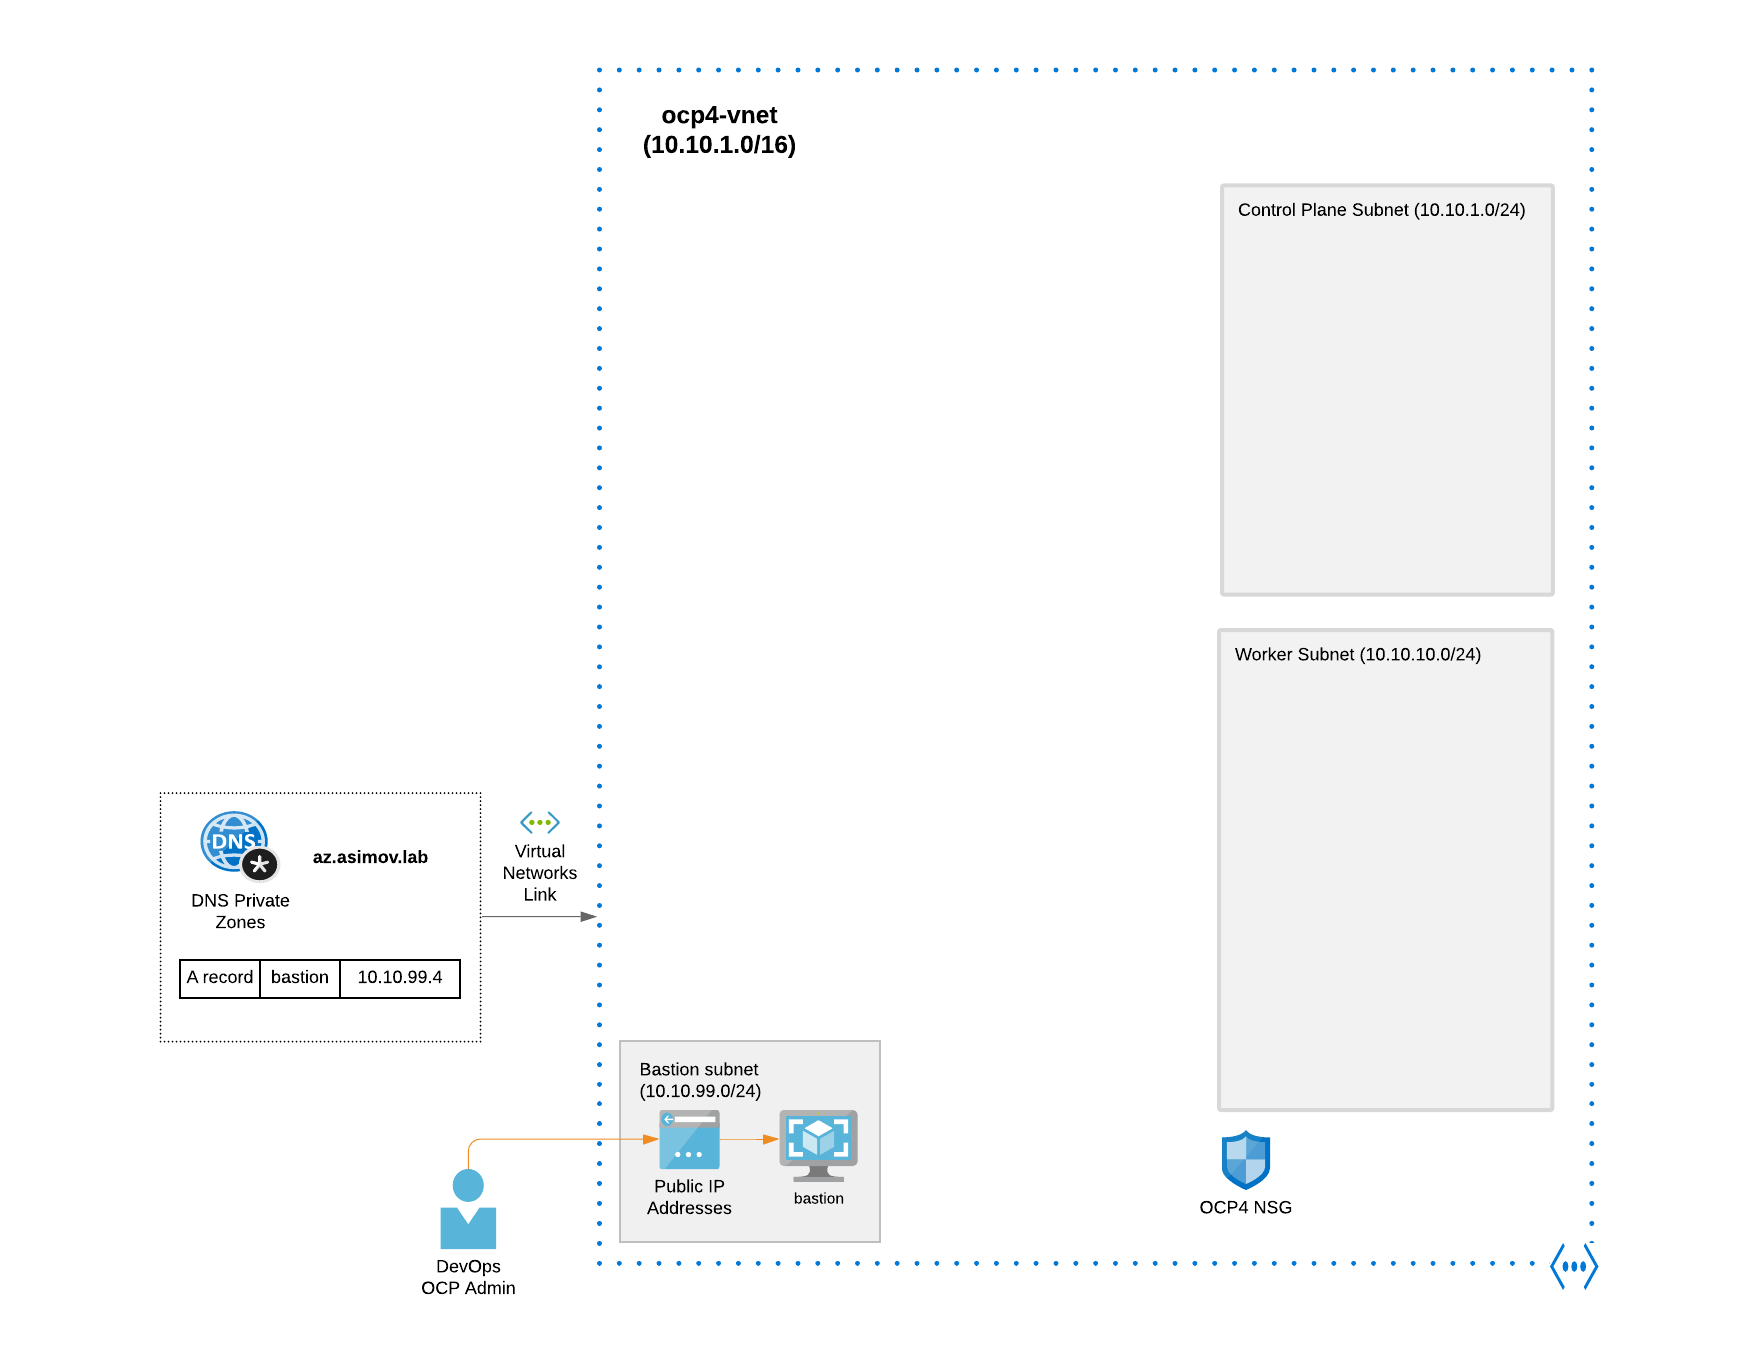
- Bastion Subnet (10.10.99.0/24 in our case)
- Bastion Public IP
- Bastion Private Zone Record (az.asimov.lab in our case)
- Bastion VM (RHEL 8 or Centos Stream 8)
- Virtual Network Link (to link VNet and private DNS Zone)
This is an example of architecture with all the prerequisites of the Azure infrastructure required deployed:
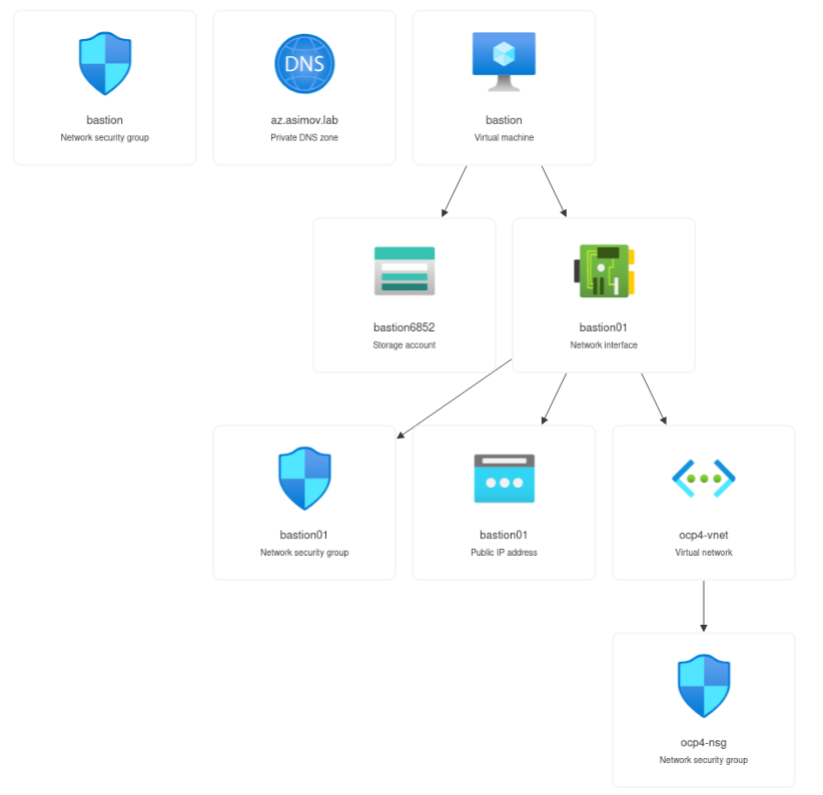
And the output of these resources in Azure Portal could be the following:
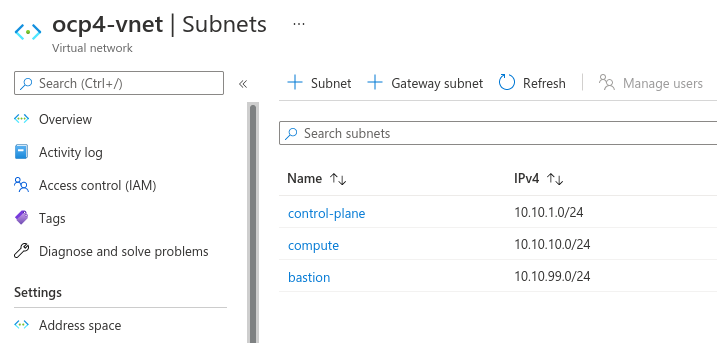
and the Azure Subnets within the VNet are:
The cluster must be able to access the resource group that contains the existing VNet and subnets.
Because Azure distributes machines in different availability zones within the region that you specify, your cluster will have high availability by default.
By deploying OpenShift into an existing Azure VNet, we might be able to avoid service limit constraints in new accounts or more easily abide by the operational constraints.
All of the architecture diagrams, schemas, automation code and much more is in my personal repo for OCP4 azure IPI. Check this out and if it’s useful, give them a star!
2.1 Configure Azure Account and increase limits
The OpenShift cluster uses a number of Microsoft Azure components, and the default Azure subscription and service limits, quotas, and constraints affect our ability to install OpenShift clusters. Check the official documentation to know more about this.
On the other hand, the Azure User Account need to have the following roles for the subscription:
Generate first the Azure Service Principal and all the requirements needed as described in the link before.
2.2 Network Security Group prerequisites
The network security groups for the subnets that host the compute and control plane machines require specific access to ensure that the cluster communication is correct. We must create rules to allow access to the required cluster communication ports.
The network security group rules must be in place before we install the cluster. If we attempt to install a cluster without the required access, the installation program cannot reach the Azure APIs, and installation fails.
These are the Network Security Group rules required by the installation.
Port - Description
80     Allows HTTP traffic
443    Allows HTTPS traffic
6443   Allows communication to the control plane machines
22623  Allows communication to the machine config server
we deployed all the rules within one Network Security Group, but you can choose to split the rules in other more restrictive NSGs, but remember, always these ports needs to be opened within the VNet.
3.3 Automatic Azure infrastructure prerequisites deployment
I’m always try to automate all the manual things. That’s my mantra. And because of this, we will automate all the Azure infrastructure prerequisites described in the steps before with my beloved Ansible tool.
But first, we need to set up some additional tweaks for deploy this automation (and also to deploy our cluster).
NOTE: This is tested on Fedora34 but also works on Centos8 and RHEL8 (but can be very easy converted to use it in Mac or Windows)
- Clone the repository for access the automation code:
git clone https://github.com/rcarrata/ocp4-azure-ipi.git
cd ocp4-azure-ipi
- Install Azure CLI and configure your account. Follow the Installation Guide for Azure CLI.
sudo rpm --import https://packages.microsoft.com/keys/microsoft.asc
echo -e "[azure-cli]
name=Azure CLI
baseurl=https://packages.microsoft.com/yumrepos/azure-cli
enabled=1
gpgcheck=1
gpgkey=https://packages.microsoft.com/keys/microsoft.asc" | sudo tee /etc/yum.repos.d/azure-cli.repo
sudo dnf install azure-cli
- Login to Azure with your creds:
az login
- Fill and create the Azure Creds for the Service Principal inherit by the OpenShift Installer
cat ~/.azure/osServicePrincipal.json
{"subscriptionId":"xxxx","clientId":"xxxx","clientSecret":"xxxx","tenantId":"xxxx"}
- Install Ansible and Azure Cli dependencies
pip install virtualenv
virtualenv ansible-210
source ansible-210/bin/activate
pip install ansible==2.10
pip install selinux
ansible-galaxy collection install azure.azcollection
pip install -r ~/.ansible/collections/ansible_collections/azure/azcollection/requirements-azure.txt
NOTE: this is prepared for use a virtualenv and not mess with our own python packages within our system. Ready to use whenever is needed with all the packages included to deploy or use Ansible modules for Azure.
- Generate a Vault-File with the credentials of Azure and OCP4 PullSecret:
ansible-vault edit vault/azure.yml
- Fill the vault.yml with your Azure credentials extracted from the early steps:
azure_subscription_id: SECRET
azure_client_id: SECRET
azure_secret: SECRET
azure_tenant: SECRET
ocp4_pull_secret: '<<< pull_secret_azure >>>'
-
For obtain the pull_secret go to OCP4 Install
-
Generate the .vault-password-file and put the password:
touch .vault-password-file
echo "yourpasswordfancy" >> .vault-password-file
4. Egress / Outbound modes in OpenShift cluster in Azure
Before to start to deploy our OpenShift private cluster in Azure, we need to investigate a deep further another important question: the Outbound Routing, or how we can from the OCP cluster VMs (and within the OCP cluster SDN) we can reach Internet.
In OpenShift private clusters, we can choose our own outbound routing for a cluster to connect to the internet. This allows us to skip the creation of public IP addresses and the public load balancer.
This outbound / user-defined routing can be configured by modifying parameters in the install-config.yaml file before installing the OCP cluster.
When configuring a cluster to use user-defined routing, the installation program does not create the following resources:
- Outbound rules for access to the internet.
- Public IPs for the public load balancer.
- Kubernetes Service object to add the cluster machines to the public load balancer for outbound requests.
We must ensure the following items are available before setting user-defined routing:
- Egress to the internet is possible to pull container images, unless using an internal registry mirror (this case is for disconnected installations).
- The cluster can access Azure APIs.
- Various allowlist endpoints are configured (to allow reach from the Azure endpoint ).
So, in a nutshell we will have 4 modes to deploy our private cluster of OpenShift in Azure:
-
Azure LoadBalancer (default)
- UDR (User Defined Routing) - Private Cluster with Proxy configuration (Bastion)
- UDR - Private cluster with Network Address Translation
- UDR - Private cluster with Azure Firewall
In all cases, we will deploy all the Azure infrastructure prerequisites first, deploy and configure the Bastion, and then from the bastion we will start the OpenShift IPI installation using the OpenShift Installer, generating all the required infrastructure and configuration automatically managed by the installer.
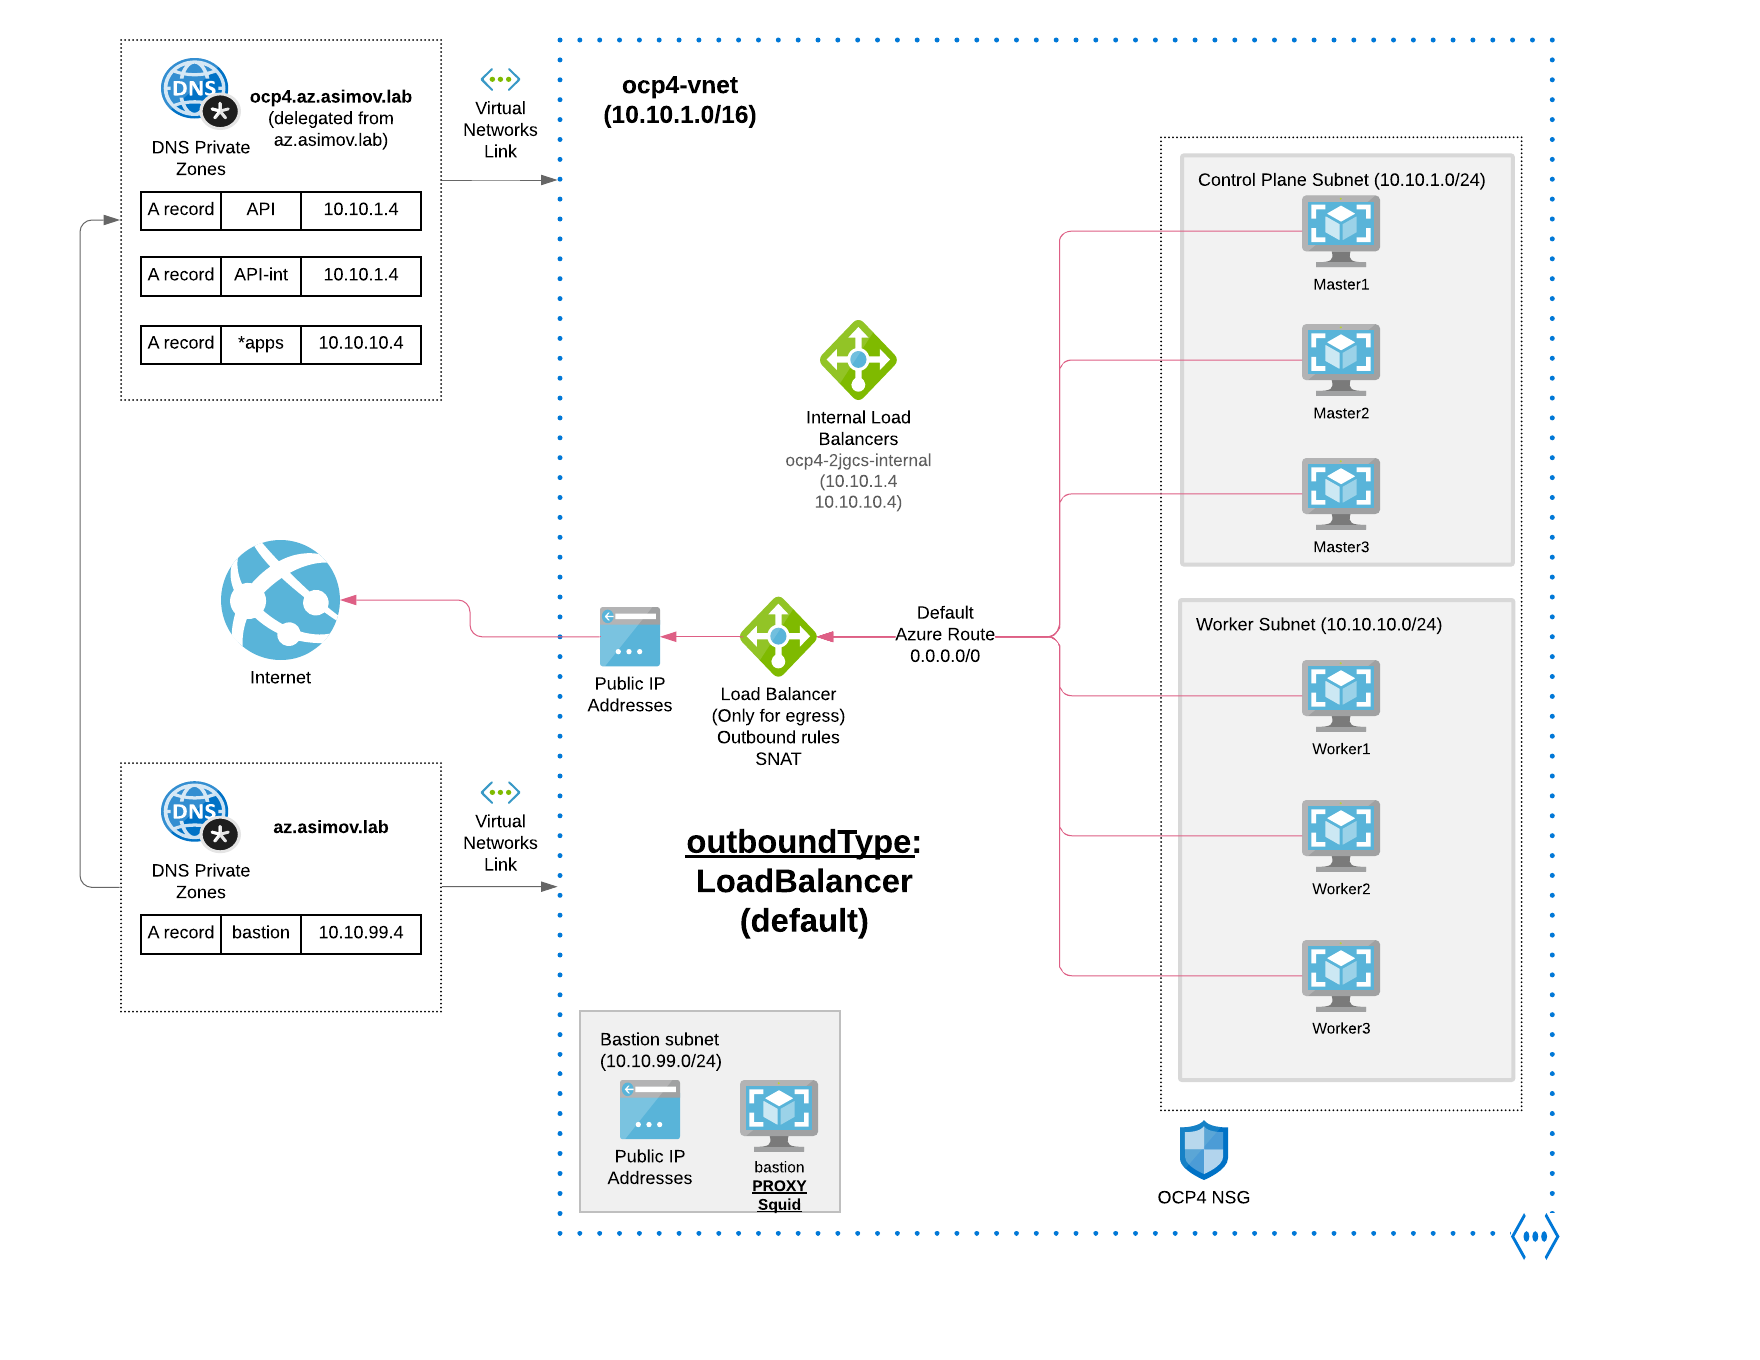
4.1 Egress/Outbound Mode with Azure LoadBalancer (default)
You can use an Azure Load Balancer to provide outbound internet access for the subnets in your cluster.
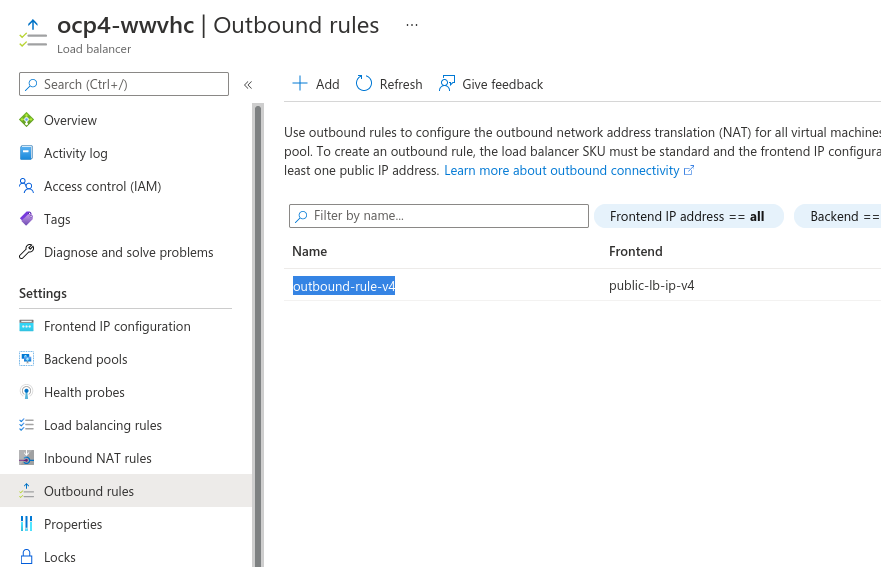
The outbound will be routed by the Default Azure Route (0.0.0.0/0) to the Azure Load Balancer (generated only for egress), and using Outbound rules and SNAT will route the egress to the Internet.
- Azure LB Frontend with Public IP
- Azure LB Outbound Rule SNAT
This is the default OpenShift egress in a regular / connected deployment, and also can be used in the private OpenShift deployments, but presents some inconveniences because needs to have a public IP, and a “public” Azure Load Balancer that will be used by the OCP cluster VMs to the egress SNAT. Public IPs or External endpoints are not allowed by some organizations, and due to can not be used as is.
When using the default route table for subnets, with 0.0.0.0/0 populated automatically by Azure, all Azure API requests are routed over Azure’s internal network.
- To deploy fully automated this architecture we can use the following Ansible automation code:
ansible-playbook install-private.yml -e "egress=Loadbalancer" -e "azure_outboundtype=Loadbalancer" --vault-password-file .vault-file-password
this will deploy, setup and configure all the prerequisites, and the Azure infrastructure needed for this outbound mode, and then the OpenShift private cluster within the VNet and Subnets.
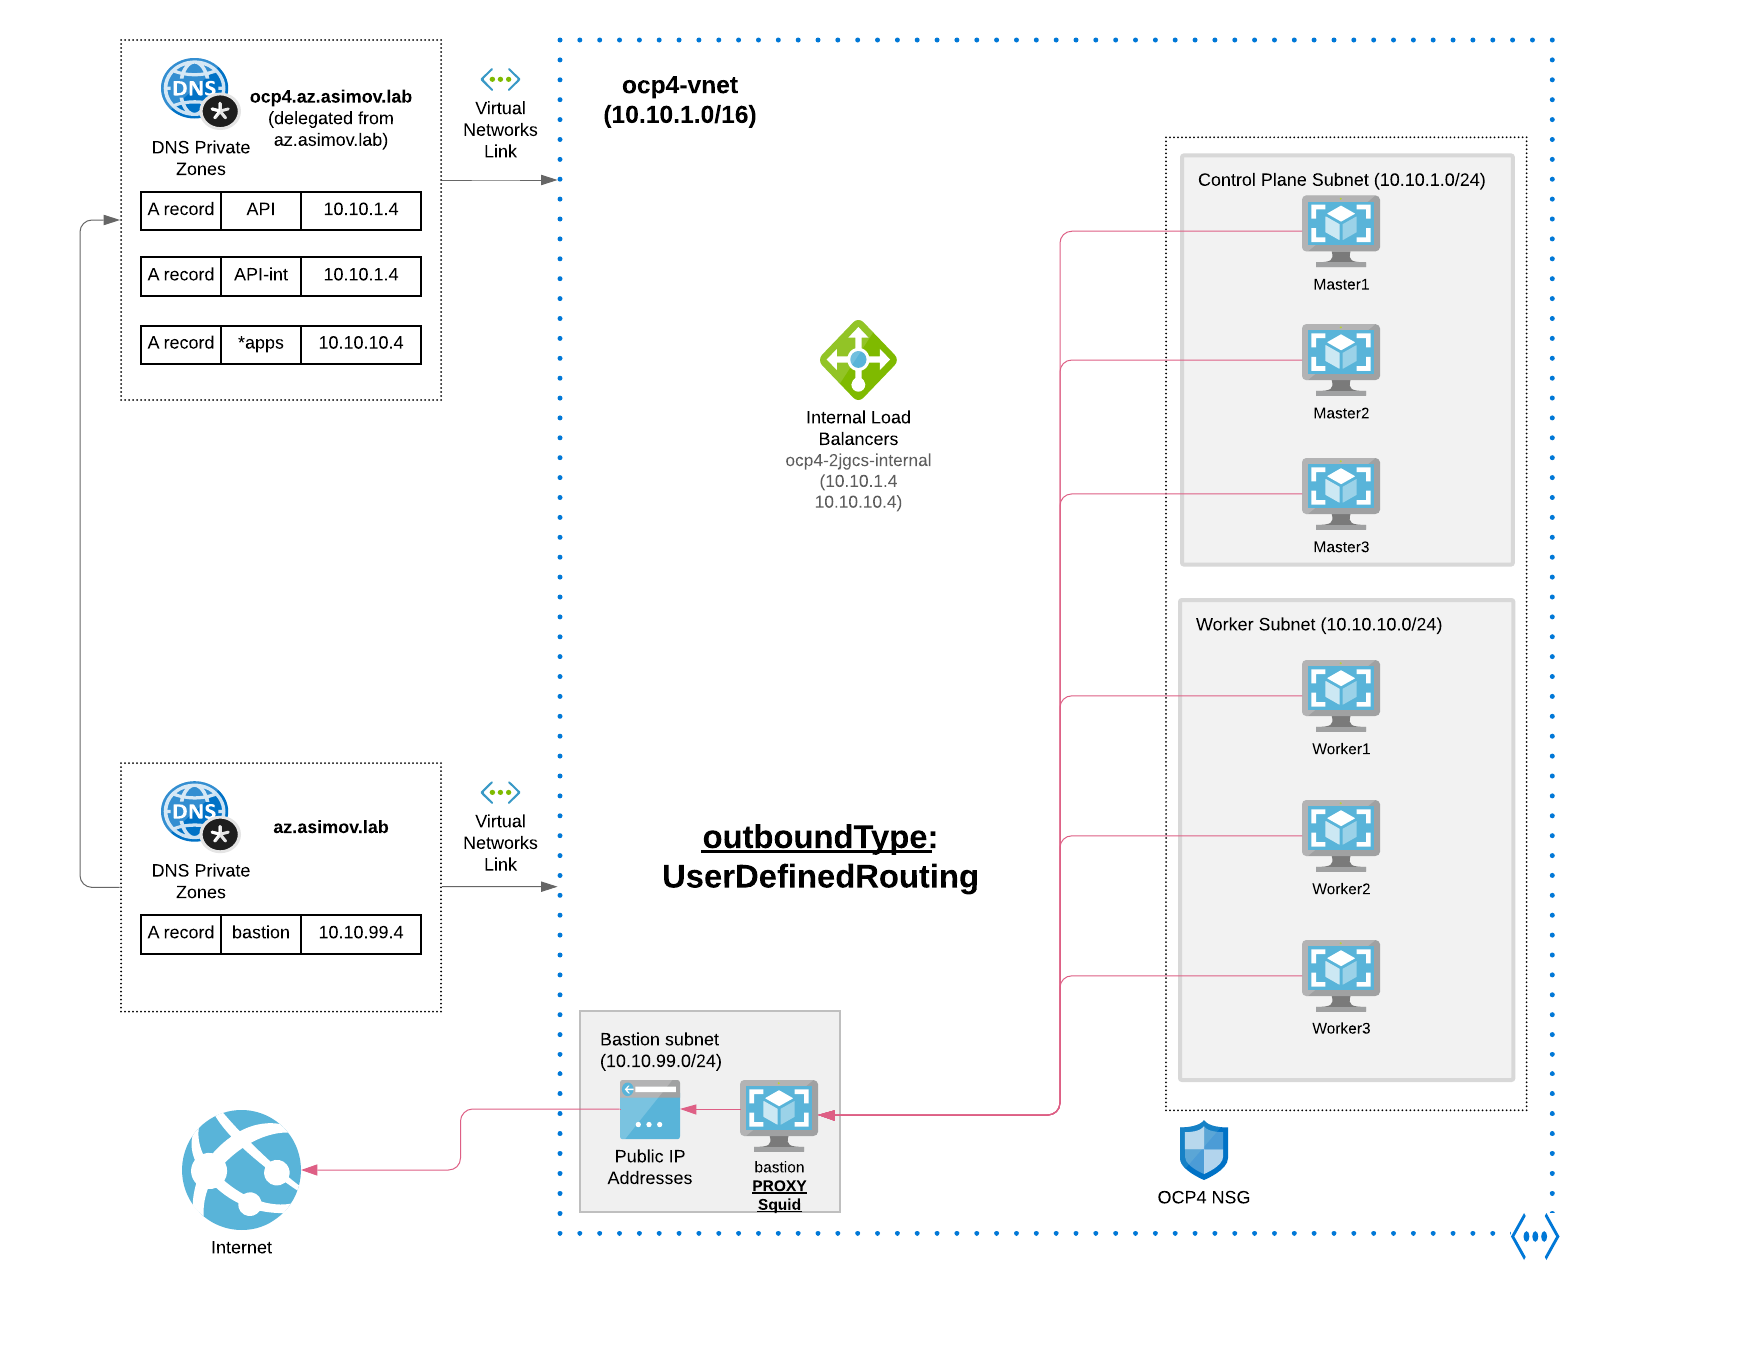
4.2 Egress/Outbound Mode with Proxy (preferred option)
As alternative to the first mode with Public Azure LB we can use a proxy with user-defined routing to allow egress to the internet. This could be a useful alternative in situation where the customer don’t allow to generate ANY public resource like Public IP, public LB, etc
as we can see the following items are not required when we or created when you install a private cluster:
- A BaseDomainResourceGroup, since the cluster does not create public records
- Public IP addresses
- Public DNS records
- Public endpoints
When using the default route table for subnets, with 0.0.0.0/0 populated automatically by Azure, all Azure API requests are routed over Azure’s internal network. As long as the Network Security Group rules allow egress to Azure API endpoints, proxies with user-defined routing configured allow you to create private clusters with no public endpoints.
So in a nutshell we’re routing all the traffic through the Bastion Proxy (squid in our case), controlling and having the possibility to whitelisting or blacklisting the traffic that goes though the Proxy from the OCP cluster.
On the other hand, we must ensure that cluster Operators do not access Azure APIs using a proxy; Operators must have access to Azure APIs outside of the proxy.
- To deploy fully automated this architecture we can use the following Ansible automation code:
ansible-playbook install-private.yml -e "egress=proxy" --vault-password-file .vault-file-password
- This Ansible automation code will deploy, setup and configure all the prerequisites, and the Azure infrastructure needed for this outbound mode, and then the OpenShift private cluster within the VNet and Subnets.
...
...
TASK [ocp4-cloud-ipi : Create resource group] *************************************************************************
changed: [localhost]

TASK [ocp4-cloud-ipi : Create Network Security Group for OCP4] ********************************************************
changed: [localhost]

TASK [ocp4-cloud-ipi : Create virtual network] ************************************************************************
changed: [localhost]

TASK [ocp4-cloud-ipi : Add subnet for control-plane] ******************************************************************
changed: [localhost]
...
...
- The Proxy will be deployed within the Bastion host, and will be used for the installation of the private OpenShift cluster from the Bastion:
...
...
TASK [ocp4-cloud-ipi : [INSTALL_CONFIG] Installing OpenShift Cluster...] **********************************************
changed: [bastion]

TASK [ocp4-cloud-ipi : [INSTALL_CONFIG] Check pid of OpenShift-install] ***********************************************
ok: [bastion]

TASK [ocp4-cloud-ipi : [INSTALL_CONFIG] Wait for the main installer to finish - may take around 25 minutes] ***********
ok: [bastion]

TASK [ocp4-cloud-ipi : [INSTALL_CONFIG] Wait for the Bootstrap] *******************************************************
changed: [bastion]

TASK [ocp4-cloud-ipi : [INSTALL_CONFIG] Wait for the cluster] *********************************************************
changed: [bastion]

TASK [ocp4-cloud-ipi : [INSTALL_CONFIG] Create the kube filesystem] ***************************************************
changed: [bastion]

TASK [ocp4-cloud-ipi : [INSTALL_CONFIG] Copy the Kubeconfig to the know location] *************************************
changed: [bastion]

PLAY RECAP ************************************************************************************************************
bastion                    : ok=25   changed=21   unreachable=0    failed=0    skipped=266  rescued=1    ignored=0
localhost                  : ok=15   changed=12   unreachable=0    failed=0    skipped=131  rescued=0    ignored=0
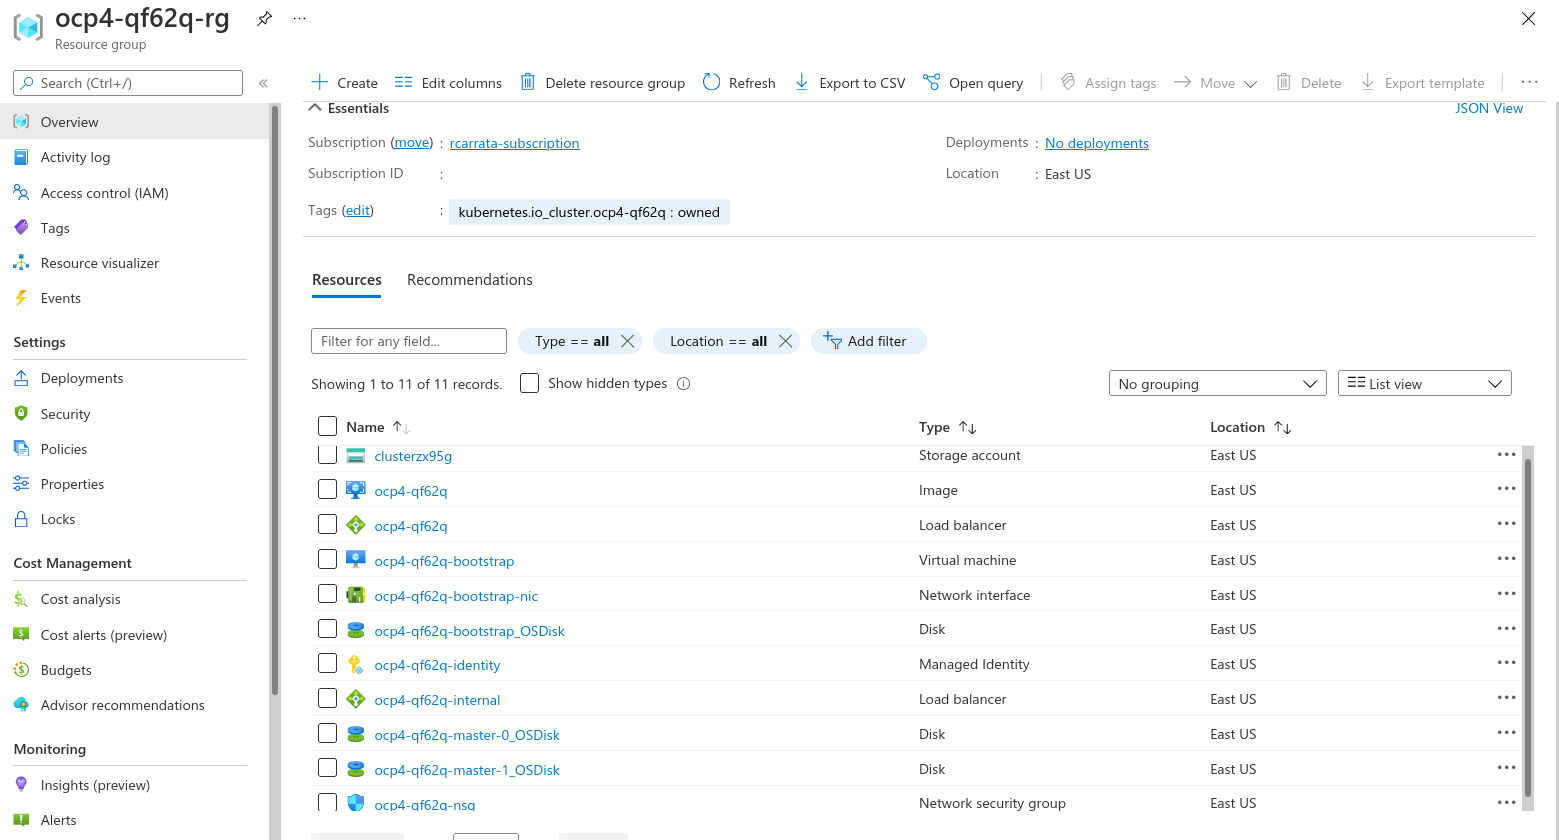
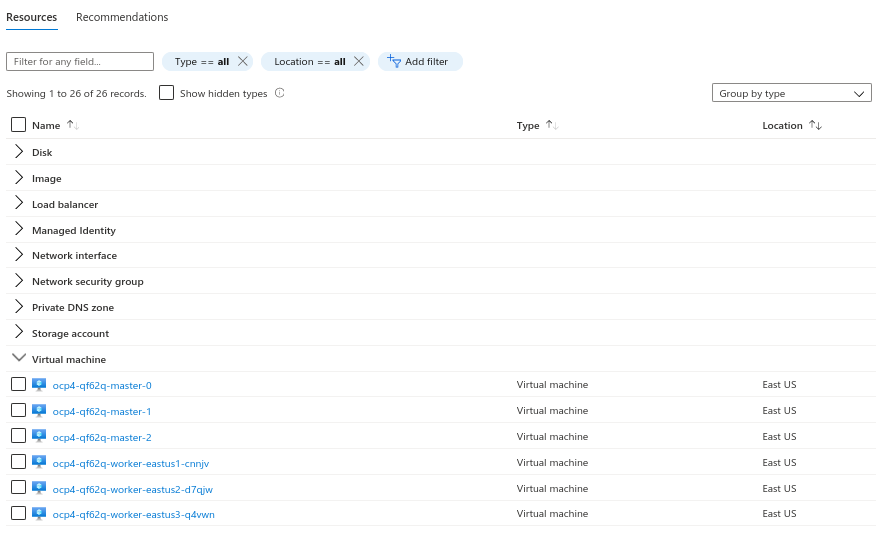
- After the process of the installation we will have these different Azure resources in a new Resource Group:
- And if we check the logs within the Bastion of the OpenShift installation we will see that everything completed properly:
time="2022-03-10T14:06:00Z" level=debug msg="Using Install Config loaded from state file"
time="2022-03-10T14:06:00Z" level=info msg="Waiting up to 40m0s for the cluster at https://api.ocp4.az.asimov.lab:6443 to initialize..."
time="2022-03-10T14:06:00Z" level=debug msg="Cluster is initialized"
time="2022-03-10T14:06:00Z" level=info msg="Waiting up to 10m0s for the openshift-console route to be created..."
time="2022-03-10T14:06:00Z" level=debug msg="Route found in openshift-console namespace: console"
time="2022-03-10T14:06:00Z" level=debug msg="OpenShift console route is admitted"
time="2022-03-10T14:06:00Z" level=info msg="Install complete!"
time="2022-03-10T14:06:00Z" level=info msg="To access the cluster as the system:admin user when using 'oc', run 'export KUBECONFIG=/root/ocp4/auth/kubeconfig'"
time="2022-03-10T14:06:00Z" level=info msg="Access the OpenShift web-console here: https://console-openshift-console.apps.ocp4.az.asimov.lab"
time="2022-03-10T14:06:00Z" level=info msg="Login to the console with user: \"kubeadmin\", and password: \"CGYKS-B2erz-VfeA6-tM9m2\""
time="2022-03-10T14:06:00Z" level=debug msg="Time elapsed per stage:"
time="2022-03-10T14:06:00Z" level=debug msg="Cluster Operators: 1s"
time="2022-03-10T14:06:00Z" level=info msg="Time elapsed: 1s"
- Furthermore, from the bastion we can reach the API and check that effectively we have all the nodes of the OCP cluster deployed properly in Azure:
[root@bastion ocp4]# ./kubectl get nodes
NAME                              STATUS   ROLES    AGE   VERSION
ocp4-qf62q-master-0               Ready    master   51m   v1.22.3+ffbb954
ocp4-qf62q-master-1               Ready    master   51m   v1.22.3+ffbb954
ocp4-qf62q-master-2               Ready    master   50m   v1.22.3+ffbb954
ocp4-qf62q-worker-eastus1-cnnjv   Ready    worker   35m   v1.22.3+ffbb954
ocp4-qf62q-worker-eastus2-d7qjw   Ready    worker   32m   v1.22.3+ffbb954
ocp4-qf62q-worker-eastus3-q4vwn   Ready    worker   28m   v1.22.3+ffbb954
- We can check that we have this VMs / nodes that correspond with the cluster in the Azure Portal as well as resources inside of the Resource Group generated by the installer:
4.2.1 Checking the Proxy connectivity
Now that we have our OpenShift cluster up && running, let’s check the connectivity from inside of one of our pods within the cluster to check if the Proxy is working properly also after the installation.
- Check the http_proxy inside of the cluster
[root@bastion ~]# oc run debug-pod --image registry.access.redhat.com/rhel7/rhel-tools -i --tty --rm
If you don't see a command prompt, try pressing enter.
[root@debug-pod /]# curl
curl: try 'curl --help' or 'curl --manual' for more information
- Curl with the -m without the proxy enabled
[root@debug-pod /]# curl https://rcarrata.com -I -m 3
curl: (7) Failed connect to rcarrata.com:443; Operation now in progress
- Export inside the debug-pod the proxy
[root@debug-pod /]# export http_proxy=http://bastion.az.asimov.lab:3128
[root@debug-pod /]# export https_proxy=http://bastion.az.asimov.lab:3128
- Check that the connectivity is running ok
[root@debug-pod /]# curl https://rcarrata.com -I -m 3
HTTP/1.1 200 Connection established
HTTP/1.1 200 OK
and voilà! This seems to be working as expected.
5. Connecting to our private cluster from the Internet
We demonstrate how we can reach our API from the Bastion, but how we can reach our OpenShift Console?
There are several options, like having a VPN Gateway, an Express Route or even deploying a VM and use Azure Bastion to connecting from there to the Bastion.
But there is a very simple, cost-effective way to do that, use the Bastion for enable a Proxy Socks5 ssh connection.
A SOCKS proxy is an SSH encrypted tunnel in which configured applications forward their traffic down, and then, on the server-end, the proxy forwards the traffic to the general Internet.
Unlike a VPN, a SOCKS proxy has to be configured on an app-by-app basis on the client machine, but we can set up apps without any specialty client software as long as the app is capable of using a SOCKS proxy. On the server-side, all you need to configure is SSH.
Let’s do try it!
- Connect to the bastion using the private key generated
ssh -i vault/ssh-key  -D 9000 az-admin@xx.xx.xx.xx
Activate the web console with: systemctl enable --now cockpit.socket
[az-admin@bastion ~]$ sudo -i
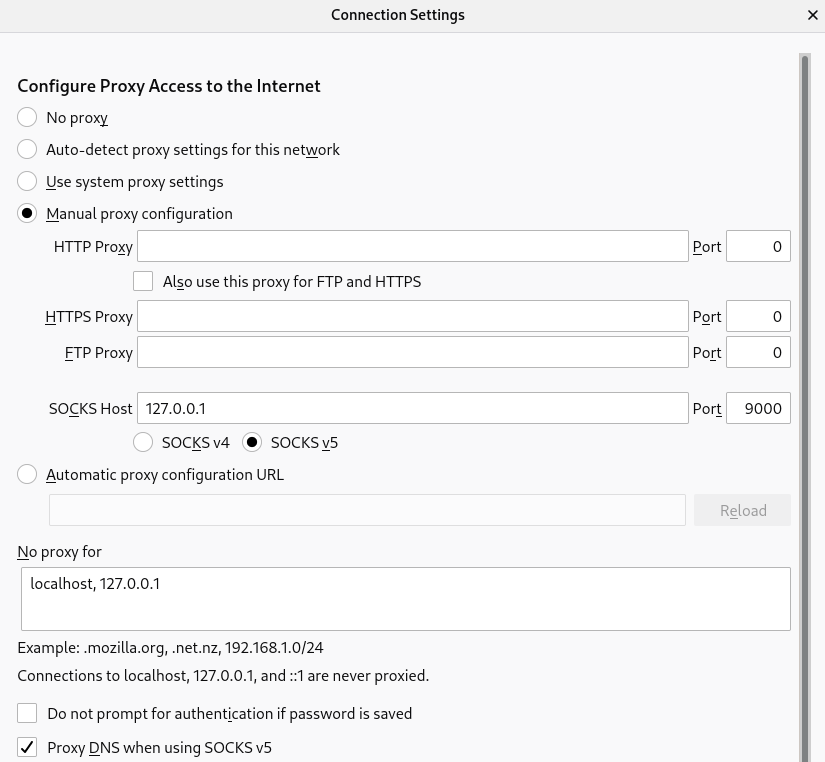
- And then connect using the Proxy Socks with the DNS option enabled. An example with Firefox is:
as you can check the SOCKSv5 needs to be enabled, we used here the port 9000.
And then the most important check is the “Proxy DNS when using SOCKSv5” option. This option will redirect and resolve all the requests from our browser through the Proxy socks SSH tunnel, reaching the Azure DNS private records, and then resolving our OpenShift Console.
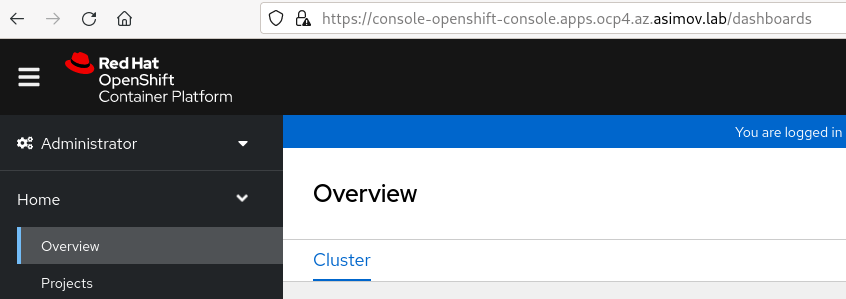
- Now if we use our regular ocp console url in our browser, we will see the OpenShift console without need of setting an expensive VPN or ExpressRoute.
But remember that it’s only for testing purpose, once the ssh connection is closed, or if the VM suffers any issue, this method is also unavailable.
So with that we finished the first part of this blog around deep dive of deploying Private OpenShift clusters in Azure.
NOTE: Opinions expressed in this blog are my own and do not necessarily reflect that of the company I work for.
Happy OpenShifting!

